0%

为什么要管理屏幕时间?

随着手机、平板和电脑成为日常生活的标配,我越来越意识到屏幕时间管理的重要性。很多时候,明明只是随手刷一下手机,不知不觉几个小时就过去了。与此同时,原本的一些好习惯,比如看书、专注思考,也被碎片化的信息流逐渐侵蚀。现在每次想静下心来看书,都会觉得格外费劲,甚至看一会儿就忍不住想拿起手机“补充能量”。

我开始反思:为什么会这样?其实,很多APP都在有意识地“争夺”我们的注意力——这就是所谓的“注意力经济”。像Instagram、微信、小红书、抖音等平台,通过算法不断推送你感兴趣的内容,让你停留得越来越久。你的注意力被消费、被贩卖,信息获取也从主动变成了被动。虽然平台声称是“更懂你”,但实际上它们更懂得如何利用人性的弱点,让你欲罢不能地刷下去。很多时候,我们并不是真的喜欢那些内容,只是被平台的机制牢牢拴住了。

我最深的感受是:这些APP前十分钟用得很开心,似乎都投你所好。但十分钟之后,就进入了机械刷屏的状态,明知道没什么意思,却还是停不下来。

我的尝试

  1. 系统自带的屏幕时间管理
    最开始,我尝试用手机系统自带的“数字健康”功能(iOS和安卓都有)。原理很简单:给某个APP设置每日使用时长,比如50分钟,超时后自动锁定。但问题是,解锁太容易了——只要点一下弹窗就能继续用。即使加了PIN码,最后也很难真正阻止自己。总之,这种“软限制”很难抵挡APP带来的即时满足感。

  2. 第三方屏幕时间管理APP
    后来,我试用了几款第三方APP,发现它们的控制力更强,功能也更细致。比如:

    可以为每个APP单独设置每次使用时长(如每次最多10分钟)。
    每次打开APP前,必须先完成一个中断任务,比如深呼吸练习(3秒吸气、3秒呼气,循环15秒),或者解一道数学题、填写待办事项等。
    这些中断能有效打断“无意识刷屏”的惯性,让你有机会重新思考:我真的需要打开这个APP吗?
    不过,这类APP普遍价格不菲,而且大多采用订阅制,一年就要六七十欧元。后来我找到了ScreenZen,功能更丰富、定制化程度更高,而且免费。

  3. ScreenZen的亮点

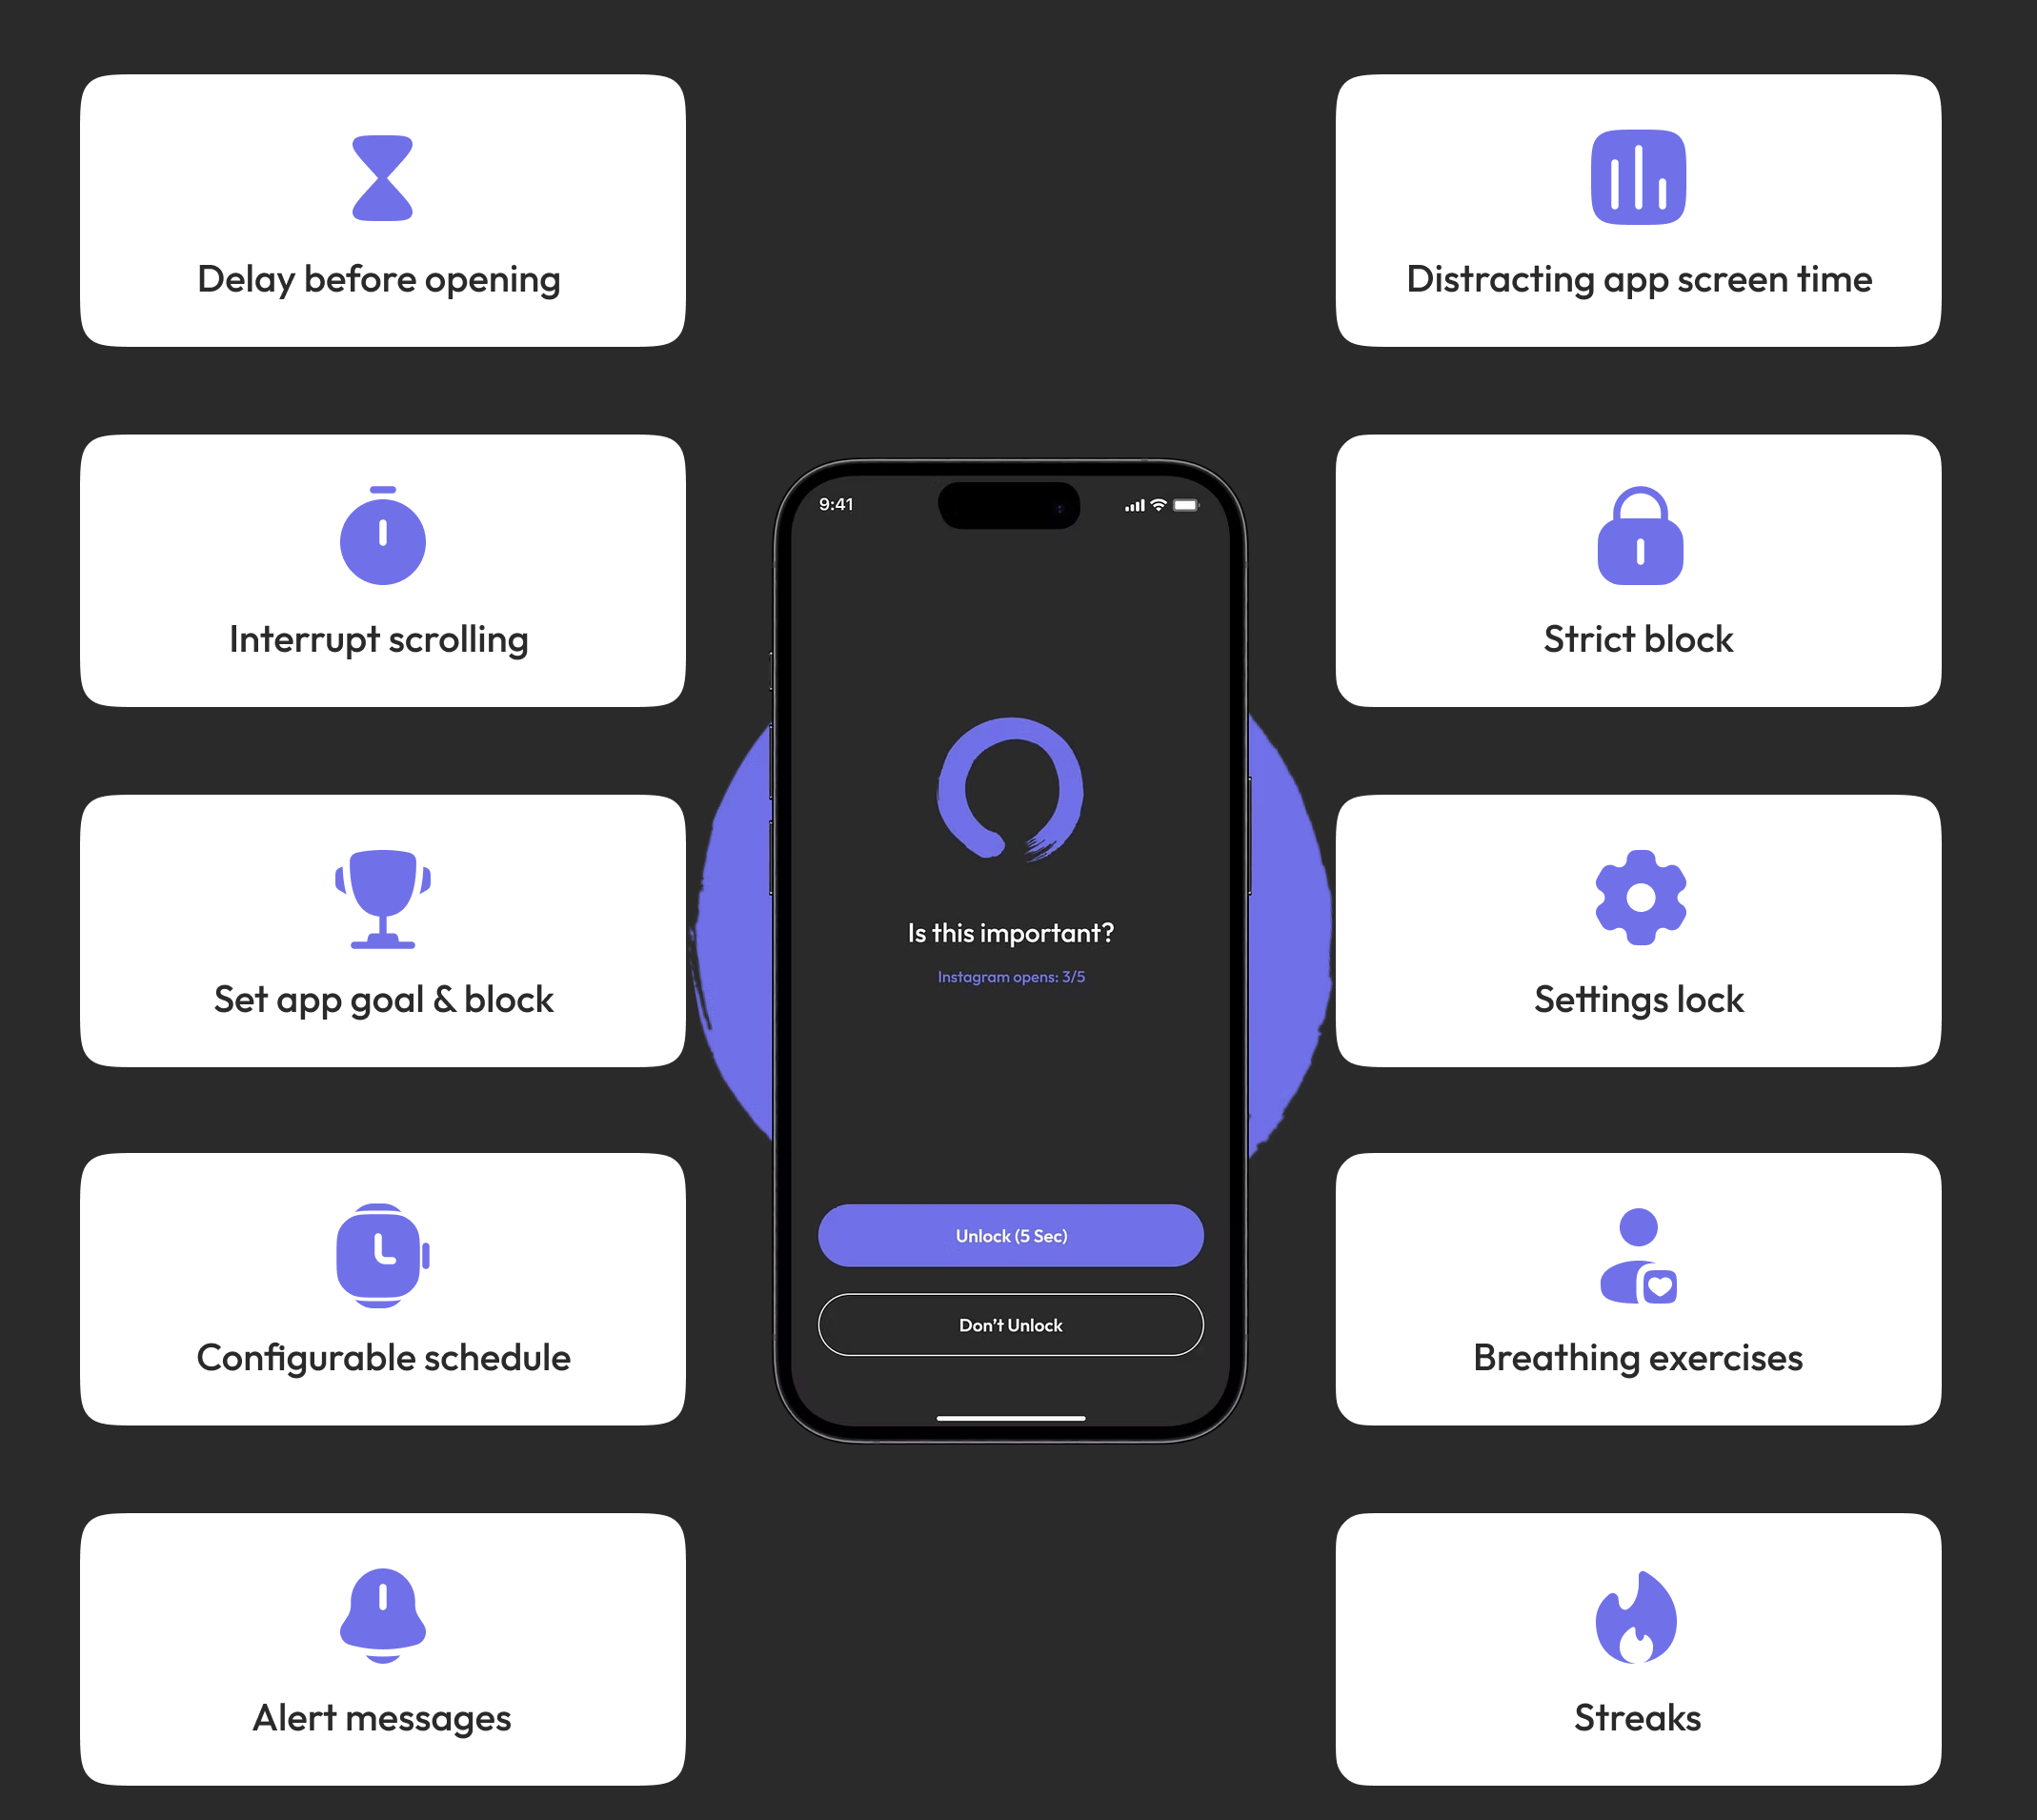
    ScreenZen有一些特别实用的功能:

    • 多种中断机制:呼吸训练、数学题、待办事项、替代应用等。
    • 灵活的规则设定:可以针对不同APP、不同时间段做个性化限制。
    • 免费且持续更新。
      屏幕成瘾的核心问题就在于“连续性”。只要在使用过程中不断被中断,就更容易跳出沉迷状态。

使用效果

  • 现在大部分时间,玩手机能享受“sweet spot”(前十分钟的快乐),但不会沉溺其中。
  • 限制了注意力经济类APP的使用后,我的信息获取更加主动,主要通过RSS等渠道订阅自己真正感兴趣的内容。
  • 偶尔也会遇到误封,比如某些APP或网站被规则误伤,导致无法访问,不过总体影响不大。

总结

屏幕时间管理不是一蹴而就的事,需要不断尝试和调整。找到适合自己的工具和方法,主动掌控自己的注意力,才能让数字生活回归健康与平衡。

Binary packages of Fio often don’t come with rado and rbd ioengine. In order to use such ioengine to test Ceph, you need to compile the fio on your own. Below are step by step instructions to build it.

  1. Clond source code
    clone the source code and check out to the specific version you want to compile. (I used fio-3.27)
    1
    2
    git clone git://git.kernel.dk/fio.git
    git checkout fio-3.27
  1. Install dependecy library and compile
    1
    2
    3
    4
    5
    6
    7
    8
    9
    apt install -y librbd-dev
    rados=yes ./configure

    #you should be able to see in the log
    # Rados engine yes
    # Rados Block Device engine yes

    rados=yes sudo make
    rados=yes sudo make install
  1. Verify
    you should be able to see rados and rbd after installation,
    1
    2
    3
    4
    5
    6
    7
    8
    9
    10
    11
    12
    13
    14
    15
    16
    17
    18
    19
    20
    21
    22
    23
    24
    25
    26
    $ sudo fio --enghelp
    Available IO engines:
    cpuio
    mmap
    sync
    psync
    vsync
    pvsync
    pvsync2
    null
    net
    netsplice
    ftruncate
    filecreate
    filestat
    filedelete
    posixaio
    falloc
    e4defrag
    splice
    mtd
    sg
    io_uring
    libaio
    rados <<<<<<<
    rbd <<<<<<<

you now run rados ioengine to benchmark Ceph

1
2
3
4
5
6
7
8
9
10
11
12
13
14
15
16
17
18
# rados.fio
# config file for fio job
[global]
#logging
#write_iops_log=write_iops_log
#write_bw_log=write_bw_log
#write_lat_log=write_lat_log
ioengine=rados
clientname=admin
pool=rados-behnch
#busy_poll=0
rw=randrw
rwmixread=10
bs=1m

[rbd_iodepth32]
iodepth=32
size=12800m

and then execute fio

1
sudo fio rados.fio

x11vnc is a Vitrutal Netowrk Computing service. It provides real display to remotely control another computer.

I have a PC with Ubuntu 19.04 but only want to use it remotely while keep its remote desktop environment accessibility. During this procedure, I have faced many issues but found rare information regarding Ubuntu 19.04. After I figured it out, I decided to write this article for those who are also troubled as I was.

Install X11VNC

1
sudo apt install x11vnc

create password (the following command create a encrpted password for the client to access the server )
The encryted password will be stored in the user folder.

1
x11vnc -storepasswd

You can then test x11vnc service by running following command.

1
2
3
x11vnc -create -xkb -display :0 -noxrecord -noxfixes -noxdamage -rfbauth /home/$username/.vnc/passwd -usepw
# -usepw: enable password authentication
# -rfbauth: specify the encrypted password file

Display Manager Change

Since Ubuntu 19.04 use gdm3 for display manager ( to display login interface), which has some problem with x11vnc and I found no solution online, I then changed display manager to lightdm by using following command.

1
sudo dpkg-reconfigure gdm3

You can change it to lightdm in the interface.

Start x11vnc on Boot

Afterwards, in order to make the x11vnc on boot, we need make it a service by creating this file to /etc/systemd/system/x11vnc.service.

1
2
3
4
5
6
7
8
9
10
11
12
13
[Unit]
Description="x11vnc"
Requires=display-manager.service
After=display-manager.service

[Service]
ExecStart=/usr/bin/x11vnc -create -xkb -display :0 -noxrecord -noxfixes -noxdamage -o /var/log/x11vnc.log -rfbauth /home/diskun/.vnc/passwd -usepw -auth guess -forever
ExecStop=/usr/bin/killall x11vnc
Restart=on-failure
Restart-sec=200

[Install]
WantedBy=multi-user.target

ExecStart is the command we wanna execute. There are some new paramters.

-o /var/log/x11vnc.log : specify the log file path

-auth guess : let x11vnc autmatically determin display manager path on startup. Without this parameter, x11vnc has problem to execute before login

-forever: Keep listening for more connections rather than exiting as soon as the first client(s) disconnect.

1
2
3
4
5
6
7
8
9
10
11
# create the file
sudo vi /etc/systemd/system/x11vnc.service
# reload configuration
sudo systemctl daemon-reload
# test the service
sudo systemctl start x11vnc
# you can test the service by
sudo systemctl status x11vnc
# or login from other computer by vnc service
# if it works well, make it run on startup
sudo systemctl enable x11vnc

Connect Remotely

You can then connect your Ubuntu 19.04 remotely. In Mac OS, you can easily connect by open Finder and press CMD + K to open connect server promp and paste folllowing such kind of url:

1
vnc://192.168.2.142:5900

vnc is the protocal to be used;
192.168.2.142 is the address of your ubuntu server;
5900 is the port to your x11vnc service run on.

Hope this can help solve your problem:D

References